Favourites


This is the first recipe I made from my first issue of Cook’s Illustrated, which I began reading in September 2002. It has been a favourite ever since. Juicy shrimp are stir fried with peanuts and whole chiles and then combined with garlic, ginger and a delicious sauce. It is great on its own, or served over steamed rice.

Kung Pao Shrimp

While the ingredient list might seem long, once you have everything assembled this dish cooks in less than 10 minutes. Make sure your pan is very hot, so that the ingredients brown instead of steam. Cook’s Illustrated recommends using a 12-inch, non-stick skillet for stir fries, which works very well.

Brown the shrimp, peanuts and chiles in a very hot pan

To avoid additives and preservatives in this recipe, you will need to make hoisin sauce and oyster sauce from scratch. I’ve included my recipes for these two sauces below. Also make sure the chicken broth, rice vinegar, sesame oil and shrimp are additive-free.

The ingredients are coated in a delicious spicy sauce

Ingredients:

1 pound extra-large shrimp (21 to 25 count), peeled and deveined

1 tablespoon dry sherry or rice wine 2 teaspoons soy sauce

3 medium cloves garlic, pressed through garlic press or minced (about 1 tablespoon)

½ inch piece fresh ginger, peeled and minced (about 2 teaspoons)

3 tablespoons peanut oil or vegetable oil

½ cup roasted unsalted peanuts or cashews

6 small whole dried red chiles (each about 1 ¾ to 2 inches long), 3 chiles roughly crumbled, or 1 teaspoon dried red pepper flakes

¾ cup low-sodium chicken broth

2 teaspoons black rice vinegar or plain rice vinegar

2 teaspoons toasted sesame oil

1 tablespoon oyster sauce (see below for additive-free version)

1 tablespoon hoisin sauce (see below for additive-free version)

1 ½ teaspoons cornstarch

1 medium red bell pepper, cut into ½-inch dice

3 medium scallions, sliced thin

Hoisin Sauce

4 tbsp. Tamari soy sauce

2 tbsp. all-natural peanut butter

1 tbsp. honey or unsulphured molasses

2 tsp. white vinegar

1/8 tsp. garlic powder

2 tsp. sesame seed oil

1 tsp. Tabasco sauce

1/8 tsp. pepper

Oyster Sauce

1 ½ tbsp. Tamari soy sauce

1 tbsp. sugar

1 ½ tsp cornstarch

Preparation:

Toss shrimp with sherry and soy sauce in medium bowl; marinate until shrimp have absorbed flavors, about 10 minutes. Mix garlic, ginger, and 1 tablespoon oil in small bowl; set aside. Combine peanuts and chiles in small bowl; set aside. Mix chicken broth, vinegar, sesame oil, oyster-flavored sauce, hoisin sauce, and cornstarch in small bowl or measuring cup; set aside.

Heat 1 tablespoon oil in 12-inch skillet over high heat until just beginning to smoke. Add shrimp and cook, stirring about once every 10 seconds, until barely opaque, 30 to 40 seconds; add peanuts and chiles, stir into shrimp, and continue cooking until shrimp are almost completely opaque and peanuts have darkened slightly, 30 to 40 seconds longer.

Transfer shrimp, peanuts, and chiles to bowl; set aside. Return skillet to burner and reheat briefly, 15 to 30 seconds. Add remaining 1 tablespoon oil, swirl to coat pan, and add red bell pepper; cook, stirring occasionally, until slightly softened, about 45 seconds. Clear center of pan, add garlic-ginger mixture, mash into pan with spoon or spatula, and cook until fragrant, 10 to 15 seconds; stir into peppers until combined. Stir broth mixture to recombine, then add to skillet along with reserved shrimp, peanuts, and chiles; cook, stirring and scraping up browned bits on bottom of pan, until sauce has thickened to syrupy consistency, about 45 seconds. Stir in scallions; transfer to serving plate and serve immediately. Serves 4.

From the September 2002 issue of Cook’s Illustrated

One of our favourite fall and winter meals is roast chicken. Believe it or not, it is possible to have great-tasting roast chicken, from the grill, in 45 minutes to an hour. The secret is butterflying the bird. A butterflied chicken cooks through quickly and evenly in less time. This is also a good recipe if you are trying to reduce your fat intake, as the chicken fat renders on the grill, leaving a lovely, crispy skin.

To butterfly the chicken, place it breast-side down on a cutting board. Cut along each side of the backbone with kitchen scissors or a sharp knife and remove it. Then press down firmly on the chicken to flatten it. While the grill is preheating, sprinkle the chicken with your favourite rub. I usually use a mixture of paprika, tarragon, rosemary basil, oregano, thyme, garlic powder, onion powder, cayenne, coarse salt and pepper.

A dry rub is applied to the butterflied chicken before grilling

Ingredients:

1 chicken, 3-4 lbs., butterflied

Dry rub (ready-made rubs are available in stores, or make up your own)

Preparation:

Preheat grill to medium (about 400 degrees). Butterfly chicken (see directions above) and sprinkle with rub. When grill is ready, place the chicken, skin side up, on grill. Close grill and cook for about 45 minutes. The chicken is done when juices run clear and leg joint is loose; the internal temperature should be about 180 degrees. Serves 4.

Many people say they don’t like Brussels sprouts. But I’ve been able to turn some of them around with this recipe. Instead of boiling, steaming or microwaving the sprouts, you roast them. They develop a nice brown caramelization and don’t become mushy. Try them; you just might change your mind too!

Roasted Brussels Sprouts

Ingredients:

1 lb. Brussels sprouts

2 tbsp oil

½ tsp coarse salt

¼ tsp hot pepper flakes

Preparation:

Preheat oven to 425 degrees. Cut each sprout in half, trim the end and remove the loose outer leaves. Toss with the oil, salt and pepper flakes in a bowl. Place sprouts, cut-side down, on a parchment-lined baking sheet. Roast for 30 minutes, turning once, until tender and brown in places. Serves 2.

Pad Thai is one of my favourite meals. I used to make it from a Thai cookbook recipe that called for more than half a cup of oil, so I was very happy when the July 2002 issue of Cook’s Illustrated ran this version, which uses less than half of that.

Pad Thai

The secret to this dish is using tamarind paste, which is becoming more widely available. I’ve tried the substitutes and there really is no comparison. I’ve also seen recipes that use ketchup instead of tamarind. Don’t go there. I haven’t been able to find dried shrimp or preserved radish, but the dish is fine without them.  The ingredient list may seem long, but if you get everything ready in advance the actual cooking goes very quickly.

Assemble the ingredients in advance

To avoid additives and preservatives in this dish, use fish sauce without MSG or Sodium Benzoate, such as Thai Kitchen brand. I use Marukan rice vinegar, which has no added preservatives.

The actual cooking takes only 10 minutes

Ingredients:

2 tablespoons tamarind paste

¾ cup water (boiling)

3 tablespoons fish sauce

1 tablespoon rice vinegar

3 tablespoons granulated sugar

¾ teaspoon cayenne pepper

4 tablespoons peanut oil or vegetable oil 8 ounces dried rice stick noodles , about 1/8 inch wide (the width of linguine)

2 large eggs

¼ teaspoon table salt

12 ounces medium shrimp (31/35 count), peeled and deveined, if desired

3 cloves garlic , pressed through garlic press or minced (1 tablespoon)

1 medium shallot , minced (about 3 tablespoons)

2 tablespoons dried shrimp , chopped fine (optional)

2 tablespoons Thai salted preserved radish (optional)

6 tablespoons chopped unsalted roasted peanuts

3 cups bean sprouts (6 ounces)

5 medium scallions , green parts only, sliced thin on sharp bias

¼ cup fresh cilantro leaves (optional)

Lime wedges

Preparation:

Soak tamarind paste in 3/4 cup boiling water for about 10 minutes, then push it through a mesh strainer to remove the seeds and fibers and extract as much pulp as possible. Stir fish sauce, rice vinegar, sugar, cayenne, and 2 tablespoons oil into tamarind liquid and set aside.

Cover rice sticks with hot tap water in large bowl; soak until softened, pliable, and limp but not fully tender, about 20 minutes. Drain noodles and set aside. Beat eggs and 1/8 teaspoon salt in small bowl; set aside.

Heat 1 tablespoon oil in 12-inch skillet (preferably nonstick) over high heat until just beginning to smoke, about 2 minutes. Add shrimp and sprinkle with remaining 1/8 teaspoon salt; cook, tossing occasionally, until shrimp are opaque and browned about the edges, about 3 minutes. Transfer shrimp to plate and set aside.

Off heat, add remaining tablespoon oil to skillet and swirl to coat; add garlic and shallot, set skillet over medium heat and cook, stirring constantly, until light golden brown, about 1- ½  minutes; add eggs to skillet and stir vigorously with wooden spoon until scrambled and barely moist, about 20 seconds. Add noodles, dried shrimp, and salted radish (if using) to eggs; toss with 2 wooden spoons to combine. Pour fish sauce mixture over noodles, increase heat to high, and cook, tossing constantly, until noodles are evenly coated. Scatter ¼ cup peanuts, bean sprouts, all but 1/4 cup scallions, and cooked shrimp over noodles; continue to cook, tossing constantly, until noodles are tender, about 2-½  minutes (if not yet tender add 2 tablespoons water to skillet and continue to cook until tender).

Transfer noodles to serving platter, sprinkle with remaining scallions, 2 tablespoons peanuts, and cilantro; serve immediately, passing lime wedges separately. Serves 4.

From the July 2002 issue of Cook’s Illustrated

Pad Thai

We love beets and this year Bill planted both the red and golden varieties. This recipe from Canadian Living’s Best Vegetables pairs this sweet and colourful vegetable with onions that have been slowly cooked in sugar and vinegar until they caramelize. The recipe suggests boiling the beets, but I prefer to wrap them in foil and bake them for an hour or so in a 400-degree oven until they are tender. Once they are cooked, cool them slightly and then rub them with a paper towel to remove the skins. You can refrigerate the cooked beets until ready to proceed with the rest of the recipe.

Cooked golden and red beets

Cook the onions slowly until they caramelize

Caramelized beets and onions

To avoid additives and preservatives in this recipe, use a red wine vinegar with no sulfites added or with naturally occuring sulfites. I used Eden Organic brand.

Ingredients:

6 large beets

4 tsp butter

3 onions, sliced

2 tbsp granulated sugar

2 tbsp red wine vinegar

2 tbsp water

½ tsp salt

¼ tsp pepper

Preparation:

In large pot of boiling water, cook beets for about 40 minutes until tender (or bake, according to the directions above). Drain and let cool slightly. Rub skins off with a paper towel and cut the beets into sticks.

In a large non-stick skillet, melt butter over medium heat; cook onions, stirring often, for 7 to 10 minutes or until light golden. Sprinkle with sugar and vinegar; reduce heat to low and cook for about 20 minutes or until tender and golden.

Add beets to onions along with water, salt and pepper; heat over medium heat for 3 to 5 minutes or until heated through. Serves 4.

From Canadian Living’s Best Vegetables

Stir-fries are a great way to get dinner on the table in a hurry. This favourite from the January 2003 issue of Cook’s Illustrated contains many useful tips on stir-frying.

Stir-fried pork, green beans and red peppers with gingery oyster sauce

First, it recommends using a large non-stick skillet instead of a wok. Second, it suggests partially freezing the pork and then cutting it into ¼-inch strips, which are then marinated in soy sauce and sherry. Third, it recommends stir-frying the pork in a very hot pan in batches, so the meat browns instead of steams.

Stir-fry the pork in batches so it browns instead of steams

The meat is removed and then the beans and peppers are stir-fried separately before everything is recombined in the pan and tossed with the sauce.

The pork, beans, peppers and sauce are quickly tossed together before serving

Once you have made the sauce and chopped the meat and vegetables, the entire dish cooks in less than 15 minutes. To avoid additives and preservatives in this recipe, use tamari instead of soy sauce and an all-natural chicken broth and rice vinegar (I use Imagine Organic Chicken Broth and Marukan Seasoned Rice Vinegar). I have never been able to find additive-free oyster sauce, so I make my own by combining 3 tablespoons of tamari sauce with 2 tablespoons of sugar and 3 teaspoons of cornstarch.

Ingredients:

12 ounces pork tenderloin cut crosswise into ¼-inch slices; then cut the slices into ¼-inch strips

2 tsp soy sauce

2 tsp plus 1 tbsp dry sherry

1/3 cup low-sodium chicken broth

2 ½ tbsp oyster sauce

2 tsp toasted sesame oil

1 tsp rice vinegar

¼ tsp ground white pepper

1 tsp cornstarch

2 cloves garlic, minced (about 2 tsp)

2-inch piece of ginger, grated (about 2 tbsp)

3 tbsp peanut oil or vegetable oil

12 oz. green beans, cut on bias into 2-inch lengths

1 large red bell pepper (about 8 ounces), but into 3/4-inch squares

3 medium scallions, sliced thin on bias

Preparation:

Combine pork, soy sauce, and 2 teaspoons sherry in small bowl. Whisk remaining 1 tablespoon sherry, chicken broth, oyster sauce, sesame oil, rice vinegar, white pepper, and cornstarch in measuring cup. Combine garlic, ginger and 1 1/2 teaspoons peanut oil in small bowl.

Heat 1 1/2 teaspoons peanut oil in 12-inch nonstick skillet over high heat until smoking; add half of pork to skillet and cook, stirring occasionally and breaking up clumps, until well-browned, about 2 minutes. Transfer pork to medium bowl. Repeat with additional 1 1/2 teaspoons peanut oil and remaining pork.

Add 1 tablespoon peanut oil to now-empty skillet; add green beans and cook, stirring occasionally, until spotty brown and tender-crisp, about 5 minutes; transfer to bowl with pork.

Add remaining 1 1/2 teaspoons oil to skillet; add bell pepper and cook, stirring frequently, until spotty brown, about 2 minutes.

Clear center of skillet, then add garlic/ginger mixture to clearing; cook, mashing mixture with spoon, until fragrant, about 45 seconds, then stir mixture into peppers. Add pork and green beans; toss to combine. Whisk sauce to recombine, then add to skillet; cook, stirring constantly, until sauce is thickened and evenly distributed, about 30 seconds. Transfer to serving platter; sprinkle with scallions and serve. Serves 4.

From the January 2003 issue of Cook’s Illustrated

Everyone has their own favourite potato salad recipe, and this one from the July 2002 issue of Gourmet is ours. It is simple and delicious. A few tips: Use large, thin-skinned boiling potatoes of equal size so they are cooked at the same time. Be sure to cook the potatoes through – a paring knife should easily pass through the centre of the largest potato. Drain the potatoes and peel them as soon as they are cool enough to handle. Keep them whole until you are finished peeling all of them. Then quickly cut them into cubes and toss them with the vinegar and salt while they are still hot. This permits the potatoes to soak up the salt and vingar. As you toss the potatoes, you will notice that their exterior softens; this is a good sign.

The potatoes soften when you toss them with the vinegar and salt

All you do after this is toss in the chopped celery, onion and eggs and mix in the mayonnaise. Cover and refrigerate until serving.

Old-Fashioned Potato Salad

Ingredients:

2 lb equal-size boiling potatoes

3 tablespoons cider vinegar

1 teaspoon salt

3/4 cup chopped celery or green pepper

1/2 cup chopped white onion

3 large hard-boiled eggs, chopped

1 cup mayonnaise (I use Hellman’s regular)

Preparation:

Cover potatoes with salted cold water by 2 inches in a 3-quart saucepan and simmer uncovered until just tender, 15 to 30 minutes, depending on size of potatoes. Drain in a colander and cool slightly.

While potatoes are simmering, whisk together vinegar and salt in a large bowl until salt is dissolved. Make the hard-boiled eggs and chop the celery and onion.

When potatoes are just cool enough to handle, peel and cut into 1-inch pieces, add to vinegar mixture, and toss gently with a rubber spatula to combine. Let cool to room temperature, then add remaining ingredients and salt and pepper to taste and stir gently to combine. Serve at room temperature or chilled. 
Makes 6 servings.

From the June 2002 issue of Gourmet

Our tomatoes are ripening, which means it’s time for the simplest and most delicious salad – sliced tomatoes drizzled with olive oil and balsamic vinegar and topped with fresh herbs and cheese.

I love fresh basil and slices of bocconcini cheese on tomatoes; another great topper is goat cheese, slightly softened in the microwave. In the photos below, heirloom tomatoes are served with mixed greens and crumbled feta cheese.

To avoid additives and preservatives, be sure to use a balsamic vinegar labelled “no sulfites added” or “contains only naturally occurring sulfites”. As for the cheese, check the label to make sure it has no artificial ingredients added.

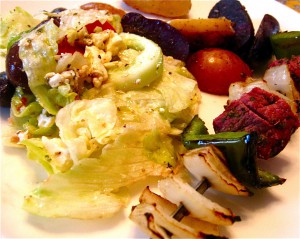
This is a family favourite from a well-thumbed copy of Elizabeth Rozin’s Ethnic Cuisine – How to Create the Authentic Flavours of 30 International Cuisines (1983). Chunks of boneless lamb are marinated for several hours or overnight in olive oil, lemon juice, dried oregano, salt and pepper before grilling.

Grilled Lamb Souvlaki

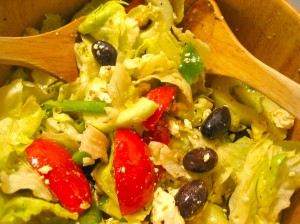
I serve this with the Greek salad from the same cookbook. The recipe calls for iceberg lettuce, but romaine would stand up to the dressing just as well. Avoid mixed greens, which would quickly wilt in this assertive dressing.

Greek Salad

Round out the menu with grilled baby potatoes tossed with oil, oregano and lemon juice.

Lamb Souvlaki with Greek Salad and Potatoes

To avoid additives and preservatives in this recipe, use fresh lemon juice. Check the ingredients in the black olives and feta and avoid ones with preservatives added.

Souvlaki

Ingredients:

1/4 cup olive oil

Juice of 1 lemon

2 tbsp crumbled dried oregano

1 tsp salt

1/4 freshly ground black pepper

2 lbs. boneless lamb, cut into 1-inch cubes

1 large onion, cut into 1-inch pieces

2 green peppers, cut into 1-inch pieces

Preparation:

Combine olive oil, lemon juice, oregano, salt and pepper and beat well with a fork. Pour over lamb cubes and mix well to make sure all cubes are coated. Marinate 4-6 hours or overnight. Thread lamb onto skewers with onion and green pepper. Grill, turning once, for about 4 minutes per side or until done. Serves 4-6.

Greek Salad

Ingredients:

1 head iceberg lettuce, coarsely chopped

1 cucumber, peeled and sliced

2 tomatoes, cut into eighths

1 green pepper, seeded and chopped

2 scallions, chopped

1/2 Greek black olives

1/4 cup feta cheese, crumbled

1/2 cup olive oil

1/3 cup fresh lemon juice

2 tsp crumbled dried oregano

1 tsp salt

1/8 freshly ground black pepper

1 clove garlic, smashed

Preparation:

Combine olive oil, lemon juice, salt, pepper and garlic and beat well. Place all other ingredients in large salad bowl, pour dressing over and toss to combine. Serves 6-8.

From Ethnic Cuisine – How to Create the Authentic Flavours of 30 International Cuisines

It’s been a exceptional season for corn and we plan to keep enjoying it as long as we can. I frequently remove the kernels from the cob and sauté them with onions, peppers and herbs (see the recipe for Confetti Corn on my July 18 post). But sometimes I just want to enjoy it on the cob. Most recipes suggest boiling corn on the cob, but for the past 20 years or so, I’ve been steaming it in the microwave and I think this method beats boiling. In addition to producing tender corn, this method has a couple of other things going for it. First, you can prepare the cobs ahead of time and simply microwave them at the last minute, meaning you can avoid boiling water and the precise timing the boiling method requires. As well, because each cob is buttered and encased in its own wrapping, it is easy to serve and stays hot until you are ready to eat it. Try this method and let me know if it works for you.

To avoid additives and preservatives in this recipe, be sure to use butter that does not contain colour.

Ingredients:

Fresh cobs of corn

Melted butter (feel free to add flavourings or fresh herbs to the butter, such as cayenne, chile powder and chives)

Preparation:

Remove husks and silk from corn. Rinse cobs of corn. Take a piece of plastic wrap that is about a foot long and place it on your work surface. Place one cob of corn toward the bottom of the plastic wrap and brush it with the melted butter. Then roll up the corn in the plastic wrap (make sure the plastic wrap goes around the corn at least once) and loosely twist the ends. Repeat with remaining cobs of corn. Place the cobs on a microwave-proof dish and microwave on high for a total of 2 minutes per cob. For example, microwave four cobs of corn for 8 minutes. If the cobs are large, add one more minute (i.e., four large cobs would take 9 minutes). Let stand for at least five minutes before serving. To keep the corn hot even longer, cover the platter with a clean dish towel. Unwrap and enjoy!

« Previous PageNext Page »